How to arrange a floor drain in the bathroom: equip a shower without a tray
Relatively recently, the real limit of dreams of most Soviet people was even a small but comfortable apartment with a standard bathroom. At that time, few people thought about arranging the bathroom to their liking. There were not enough suitable building materials and basic equipment. However, today almost every bathroom is made out “for itself”. And here you can find many interesting solutions. One of them is an additional drain in the bathroom floor. Such a device makes it possible to protect yourself in the event of a leak or equip a shower without a tray.
Content
What is a ladder and how to choose it?
An obligatory element of the drain located in the bathroom floor is the gangway. This is a special device that provides free flow of fluid into the sewer. The system is designed in such a way that makes it possible:
- quickly and efficiently discharge drains;
- filter the liquid, separating large contaminants;
- prevent the appearance of extremely unpleasant sewer odors in the room;
- clean the drain system.
On sale you can find two types of devices: with a dry shutter and with a water seal.

The design of the system allows you to quickly and unobstructed drains from the room, while the unpleasant odor from the sewer can not penetrate into the room
Dry gate drain
A mechanical structure that, under the influence of gravitational forces, constantly strives to take a position that closes the sewer pipe. There are several types of mechanism: membrane, pendulum, float and device using the molecular memory of the material.

A non-return valve can be installed on dry shutter devices to ensure that no effluents enter the room
Water trap equipment
It is equipped with a tube filled with water, bent in a certain way. It is she who becomes an obstacle to sewer gases. The main disadvantage of the system is a possible drying out, which eliminates the water lock, which opens access to the room to unpleasant odors. The reason for this phenomenon may be design errors, irregular use of the ladder, the presence of underfloor heating, high temperature in the room, etc. To avoid problems, equipment needs to be spilled regularly.
In addition to design features, the dimensions of the device are important. The height at which the floor level rises depends on them. You can choose an ultra-thin device, the height of which does not exceed 6 cm, or you can prefer a twelve-centimeter standard gangway. The bandwidth of the device is also very important. To determine it, you need to compare the amount of liquid supplied to the drain and the maximum amount of effluent that it can let through.The second indicator can be taken from the technical documentation or found out from the sales assistant.

Some ladder models are equipped with non-return valves, which exclude the possibility of sewage entering the room
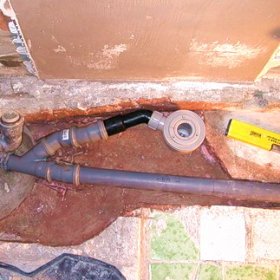
Arrangement of a shower with a floor drain
The easiest option for manufacturing an inclined floor is to arrange a drain in the shower floor. Similar systems are becoming popular. They are very convenient for older people and people with disabilities, in addition, such a system is externally very attractive.

Showers with floor drains are very convenient for older people and at the same time they have an attractive appearance
The arrangement procedure is carried out in several stages. First, determine the place where the shower will be installed, and perform markup. We mount the mold for the base of concrete. It will be a wooden frame in the form of a box of the right size, assembled from 5x10 boards.
After that, we lay the waterproofing layer. The best option is a special rubber membrane. We arrange the coating so that it covers the bottom of the mounted form completely and goes up on the walls to a height of about 20 cm. Now we fix the insulation sheet. We start from the corner. Slightly sipping the cloth, we straighten it, very tightly press the material to the board and fasten it with special nails. Mounts should be installed at least 20 cm from the bottom of the structure.
After all these works, you can begin to equip the drain hole. To do this, we cut a round hole with a sharp knife in the intended place. Its diameter should exactly match the size of the drain. If the hole is larger, liquid can seep under the insulating layer. We install the drain plate in place and tighten with bolts. Now, in accordance with the instructions, we mount the drain. We seal it with a special protective tape. So we prepare the device for concreting the floor.
We prepare the cement mortar and begin to lay it on the base. At the walls, the width of the layer should be about 6 cm, in the area of discharge - 3 cm. All work is carried out on the flat side of the spatula. At the end of the installation, the base must be dried. Then you can lay the topcoat.
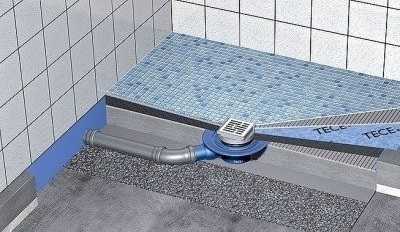
Installation of an inclined floor with a drain
It is quite difficult to independently carry out work on arranging the floor with a slope, but it is quite possible if desired. At the first stage, you need to determine the type of slope. It can be a drain from two planes or the so-called "envelope". In any case, work on the arrangement begins with the preparation of the foundation. Old flooring, if present, must be dismantled. A used concrete screed is also removed. Since this is difficult to do, you may need a hammer drill. Especially at the joints of the floor with the walls.
Carefully inspect the cleaned base. All openings, cracks or cracks must be carefully repaired. The easiest way to do this is to use inexpensive tile adhesive. It is necessary to get rid of base defects in order to prevent the rapid wear of a new screed and insulating layer, as well as to prevent overuse of waterproofing and primer. All significant irregularities found on the surface of the base will require alignment with special blends. A dried base is treated with a primer.
The next step is waterproofing the subfloor. This is a mandatory measure to minimize damage from potential leaks. Various types of coatings are used to equip the insulating layer. Most often one of the options is used:
- Lubricants. They are ready-to-use formulations or dry mixes characterized by excellent waterproofness. The consistency of sour cream material is applied to the base with a brush or roller. Before applying, the joints of the walls and the floor must be insulated with a waterproof tape.The material is applied in several layers, their amount and drying time depend on the type of coating.
- Wormhole insulation. Available in the form of roll coatings glued to the base. Most often, self-adhesive panels are used that do not require additional application of glue or its heating. The coating is laid with minimal overlap, leading to the walls. The height of this “approach” is about 15-20 cm to get a waterproof bowl.
After the waterproofing dries, you can begin to lay the screed. It is mounted from a cement-sand mixture. First, mark the mounting area. To do this, determine the location of the drain and its future height. In this case, we must take into account the width of the finish floor covering. If it is a tile, it is optimal to choose a place to drain so that the distance from the ladder to the walls is a multiple of its size plus about 2 mm for each seam. Thus, the installation of the cladding will be simplified and excessive trimming will be avoided.

Coating waterproofing is easy to apply. However, it dries long enough, which significantly delays the finishing work.
Now proceed to install the ladder. We mark the desired height on the parts and cut off the excess with a hacksaw. We insert the sealing ring into the groove and install the assembly exactly in the place intended for it. We fit the device. After the system is installed properly, we cover its upper part with a film or any other similar material to prevent possible ingress of concrete, litter or dirt during pouring of the screed.
After that, set the beacons. To do this, determine the level of the height of the future screed with a level and set the marks between which we stretch the cord to align the profiles. We draw the necessary slope to the discharge with beacons. The minimum slope is 1 cm per meter. If the slope is reduced, the drains will not have time to merge into the sewer. Now you can lay the solution. The composition prepared according to the instructions is laid out on the base. We fill all the space from the floor to the highest point of the beacon. The mixture is carefully equated with a rule and a spatula.

When laying an inclined floor with an “envelope”, the ramps formed between the broken lines of the planes have the shape of isosceles triangles
At the end of the work, we pass along the surface with a special needle roller, which is necessary to destroy the air bubbles present in concrete. We are waiting for the right time until the screed is completely dry. We remove the protective material from the ladder, after which we install a glass of siphon. On top of it we fix the sealing ring and close the device with a lid. Then we turn it all the way to the side indicated in the instructions. Some models have an additional rubber insert designed to protect the floor from moisture. If it is, install the element in place.
Now you can start laying the flooring. Practice shows that in most cases it is ceramic tile. For laying with an “envelope”, we first put a decorative frieze around the perimeter of the walls. Its width is 2-3 rows. Then we mount horizontally beacons-tiles near the ladder. Next, we lay the lining on the plane, converging with triangles to the ladder. First, we draw a row-sag, which runs from the drain to the horizontal frieze. Tiles are laid in rows, the seams of which are horizontally oriented parallel to the friezes. It will be correct to use whole tiles first.
After facing the fields of the ramp formed by isosceles triangles, you can begin to work with the cut lines. Here you will need cut tiles. The shape of each is determined individually. Tile experts advise the first to lay out the ramp, which is located directly opposite the entrance. So the design will be more accurate.Next, the right and left elements of the "envelope" are faced and, lastly, the tiles are laid on the site at the entrance to the room. A simpler option is a drain located between two planes. The fracture line here will run exactly in the center of the ladder. She also will have a seam facing.

Before installing the concrete screed, the ladder must be covered with a film or other material so that debris or dirt does not get into the drain
In the bathroom, a floor drain is installed for different purposes. It can be an element of a shower without a cabin or the so-called emergency drain. Regardless of the purpose of the system, installation work is carried out according to a similar scheme. They can be carried out independently, but it must be borne in mind that competently set beacons, high-quality screed and lay the lining can only professionals. Perhaps it will be right to entrust them with this difficult task.
1 comment