How to install a bath on bricks: lay out the brick base and side
Connoisseurs of high-class relaxation will never exchange a comfortable spacious bathtub with aromatic, therapeutic fillers and hot water for a modern shower cabin. Unmatched bliss can only be experienced in the font. You can completely relax, but only if it is stable. The method of installing the bath depends on the type of room (combined with the bathroom or independent) and its area, the size of the bath itself, the presence of other plumbing fixtures and household appliances, furniture, etc. Maximum stability is ensured by installing the bath on bricks. At the very beginning, we want to note that ergonomic requirements require that the distance to the side of the bath is about 0.9 m.
Installing the bath on the legs does not guarantee its stability: the screw mount loosens over time, reducing static. The most reliable location of the cast-iron bowl is on solid brickwork. But just putting a bowl on such a “pedestal” is not enough.
It is necessary to carry out the work efficiently, and therefore, slowly, install them step by step so that there is no gap between the side of the bathtub and the wall where the water enters, and then, over time, mold forms. First you need to understand that the cast iron products are heavy on their own, and if you take into account the average dimensions of 80x160 bathtubs at a height of 50 cm, then it is clear why the installation should be done at least by two.

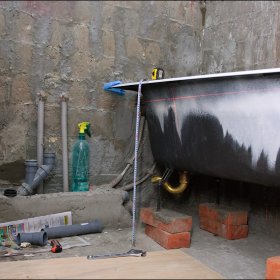
A cast-iron bathtub should be installed on a brickwork base.
Note: with the apparent archaism of such baths, they are actively used, because the heat capacity index of cast iron surpasses all other materials at times!
Brick base for a cast-iron bathtub
Just a few steps, and the bath will be installed on a solid foundation. To do this, you need:
- Measure the room and bath, consider its location in relation to other household appliances and plumbing equipment.
- Prepare bricks. They need exactly enough to lay scaffolding 2-3 bricks high across the bathhouse. An average of 20 pieces. To get a notch (bed), half a brick is laid along the edges. Depending on the length of the product, the number of rows is calculated, given that the optimal distance between them is 50 cm. The height of the bath on bricks from the sides to the floor should not be higher than 0.7 m, so that it is convenient to fit into it. The height of the front stage is 17 cm, and from the other end it is 2 cm higher.
- Masonry is done on a sand-cement mortar: 4 parts of sand with a mixture of water falls on one part of cement. The edges of the tank are attached to the wall with tile adhesive. For greater reliability, the side surfaces of the bath adjacent to the wall are treated in the same way, and the wall itself too. This ensures, firstly, a strong connection "wall-bath", and secondly, the adhesive base creates a seal joints.In the ideal case, for good adhesion of the mortar with bricks, you need to give the masonry time to stand for at least a day.
- An siphon with an overflow is mounted on a bath not yet installed. To do this, turn the bowl on its side and equip the drain hole for the siphon with rubber seals that prevent water leakage. In order not to have to “turn over” the capacity again soon, it is better to immediately take care of a high-quality reliable siphon. Sewer pipe with drain must be below the outlet siphon.
- A bathtub is installed horizontally without bias on a prepared surface according to the level laid on the bottom. But the outer edge is literally half a centimeter higher than the inside (so that there is no spill of water over the edge to the floor).
- Correct installation of a cast-iron bath on bricks involves connecting the drain to the sewer sleeve in two ways: a stronger and more reliable rigid connection: a plastic pipe and elbow with an angle of 45 ° and 90 ° are used; Flexible and mobile compensation plastic corrugation is connected hermetically with a sealant to the sewer inlet.
- Free supply of pipes for hot and cold water supply, drainage systems should be provided. It is important to immediately verify that the installation is correct. To do this, the tank is filled with water and the drain opens. If the fluid does not leave immediately, with delays, then there is a skew.
- Another nuance. Before installing the bath, the distance from its rear end to the wall is calculated. If surplus space is expected, it must also be laid with bricks. As an alternative - a support box under the bowl, just below the side.
The final touch is facing the brick base with ceramic tiles or installing a screen. Be sure to leave a working hole for possible access to the siphon.

The bath on the bricks should be at a height sufficient for the normal arrangement of the siphon
Brick side for steel bath
The technology for installing different bathtubs is generally the same. The undoubted advantage of steel plumbing tanks - their low weight (about 30 kg) - is one of the causes of instability.

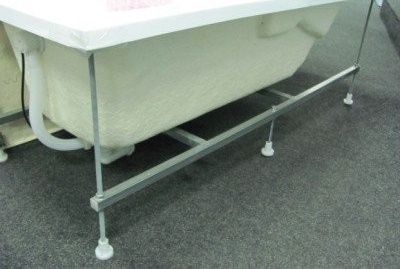
The steel bath can be installed on metal profiles, and then the structure is complemented by masonry
Installation work is carried out before the walls are faced. Before installing the bricks for the bath, they are pre-glued with rolled plastic gerlen, and the walls are treated with a moisture-proof composition. A layer of fabric in its basis serves as a dividing element (compensator) between the cement mortar and the body, changing its geometric parameters and shape depending on heating or cooling with water. For better adhesion and elimination of air zones between surfaces, tile adhesive is applied to the interlayer.
A “shirt” from the same gerlen, into which the entire iron bath is packaged, not only increases strength, but also serves as an excellent sound insulator, drowning out the noise of falling water.
Between the columns of red brick with a bath filled with water, polyurethane foam is blown from below. When the foam increases when solidifying in volume, it can lift a light capacity above the uprights. The weight of water holds the bath on the bricks. Foam heat insulator is also a good noise absorber. Finishing work is carried out with the provided hatches for the inspection of plumbing units.
It is important to note that the steel plumbing product needs grounding. The best way to do this is to use an industrial tested grounding device.
A comfortable, spacious, well-established bathtub will help you enjoy taking water procedures. It is not difficult to do this if you follow the sequence of work to install it.