DIY brick chimney
There is no stove without a chimney. The removal of carbon monoxide and smoke from the furnace is a necessary condition for the proper operation of the stove. What to make a pipe from and how to arrange it so that it serves for a long time and does not create additional problems? An experienced stove maker will answer without hesitation - from the same material as the stove itself. This is due to the fact that different materials have a different coefficient of thermal expansion. And if during the furnace the brick and metal are simultaneously heated, then a gap will form in the place of their connection. Smoke begins to ooze through the gap, this disrupts the coordinated operation of the furnace, and also poses a serious threat to the life and health of households. Therefore, if you want to build a chimney for a brick furnace, you need to do this also from brick.
Content
What is a brick chimney and where is it used
Chimneys serve for the removal of gaseous products of combustion in stoves, fireplaces and heating boilers. Smoke, carbon monoxide and soot under the influence of traction are carried out from the furnace into the pipe and are brought out. In the direction of travel, they cool, giving off heat to the walls of the chimney.
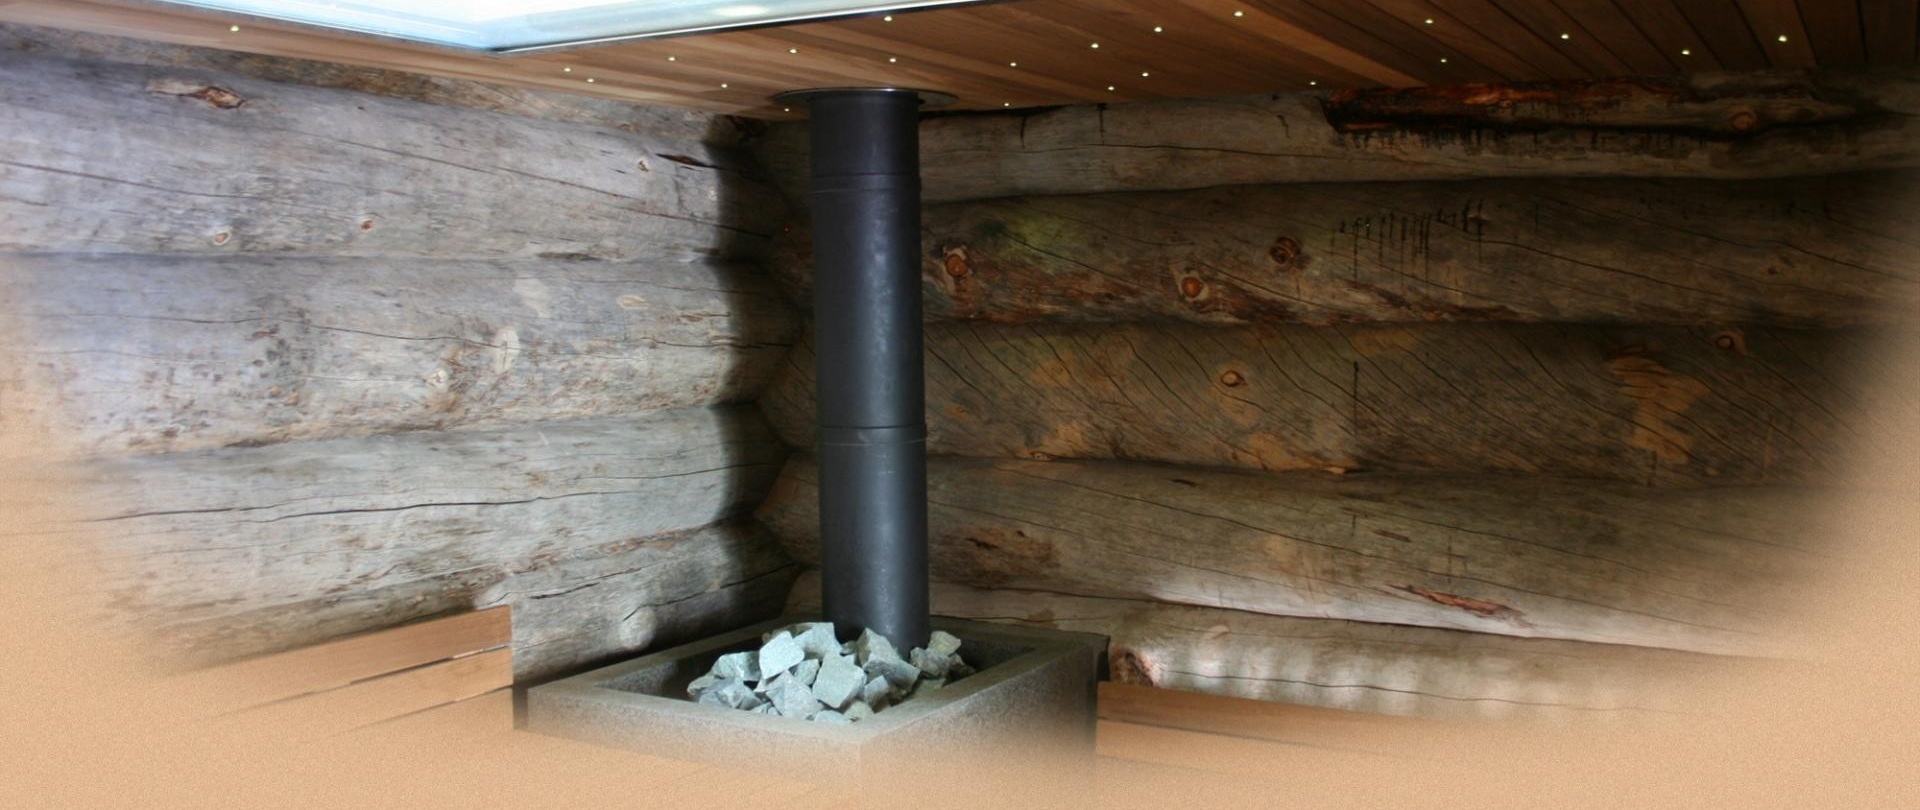
To exhaust combustion products from a brick furnace, you need to erect a chimney from the same material, i.e. from brick
Unlike metal pipes, chimney of brick has:
- Higher heat capacity coefficient. Because of this, the efficiency of such chimneys is higher. Accumulating heat inside itself, the brick gradually gives it inside the living room, thereby prolonging the time for heating the air.
- High thermal resistance. The gas temperature as a result of fuel combustion reaches 800 aboutC. Metal chimneys, warming up to such a temperature, “burn out” over time, deform, and water condensate forms on the walls. Mixing with soot, water turns into an aggressive chemical reagent.
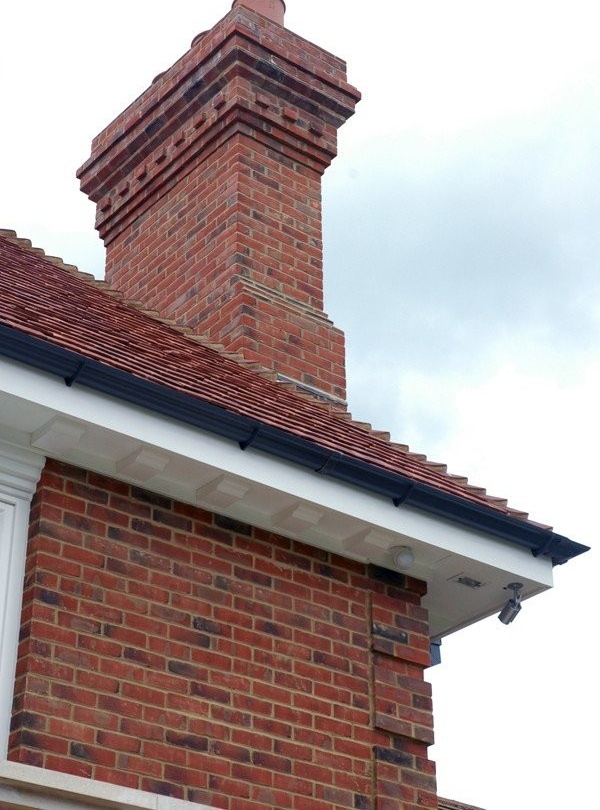
- A variety of architectural forms. The brick pipe organically fits into the style of the building, giving it additional design. Massive chimney makes the pipe resistant to mechanical damage, little exposed to natural atmospheric phenomena. Metal pipes, on the contrary, must be carefully secured, in some cases even using extensions.
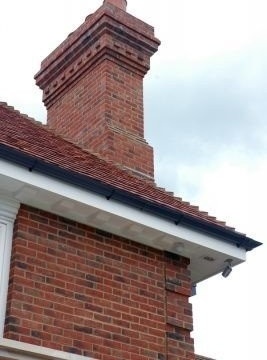
A brick pipe can serve as an architectural decoration of the house and does not require additional fastening, regardless of its size
But the brick chimney also has a rather significant minus. In country houses and country cottages, it is not possible to stack cylindrical pipes that are ideal for the passage of hot gases. The internal cross-section of a square or rectangular shape creates obstacles to the outflow of smoke. As a result, a soot layer is quickly formed on the inner walls, which reduces traction. Accordingly, they have to be cleaned more often than metal.
Chimney design and principle of operation
The classic design of the chimney is a vertical tower, inside of which there is a through hole connecting the furnace to the open space outside the house. According to the laws of physics, air pressure decreases with distance from the surface of the earth. As a result of this, a thrust arises inside the pipe — the tendency of the air mass to move from bottom to top. If you block the air from below, the draft disappears. Therefore, a smoke damper or view must be installed in the chimney, with which it is possible to regulate the draft.
Using the damper, you can adjust the size of the smoke channel, and therefore the draft
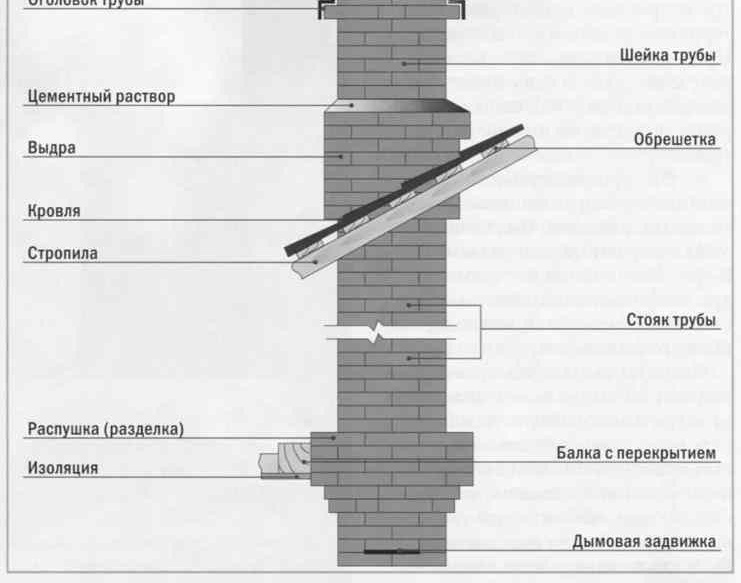
Since the pipe is operated in residential buildings, it should not be a fire hazard, therefore, the masonry is performed taking into account the maximum protection against possible fire. A certain terminology has been established among stove-makers, which reflects the structure and functional purpose of individual pipe elements.
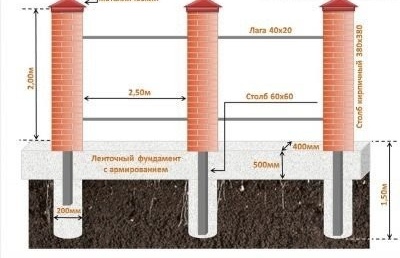
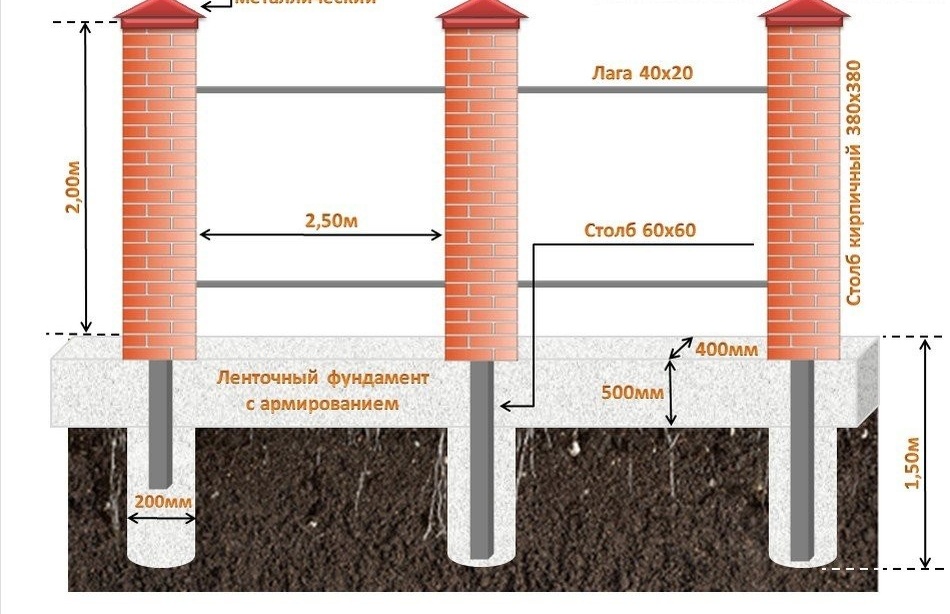
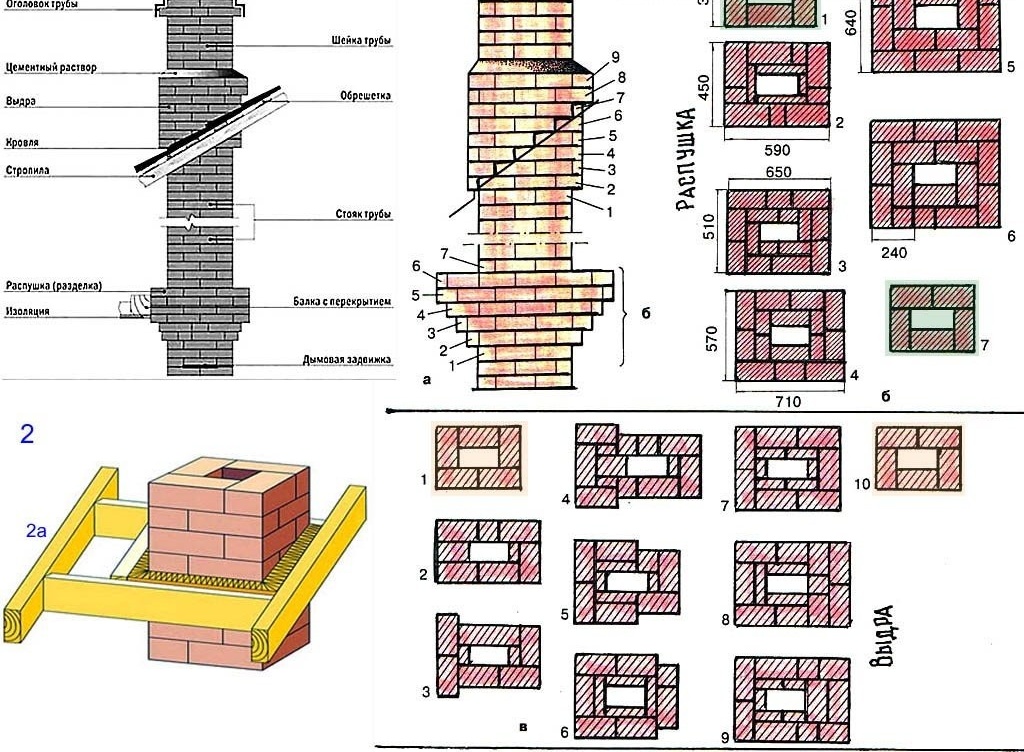
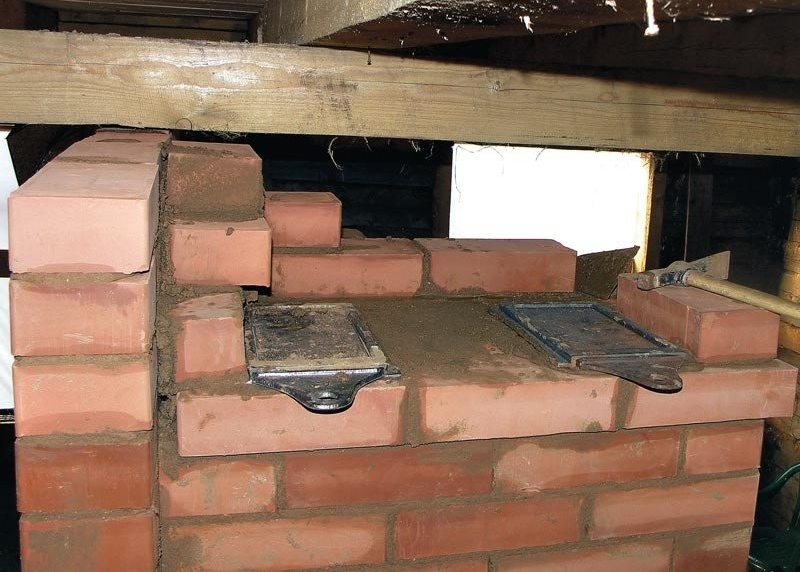
- Extension pipe. Placed directly on the furnace, connected to the combustion chamber. Usually it does not reach horizontal overlapping of 5–6 brick rows (35–40 cm). There is a valve in this part.
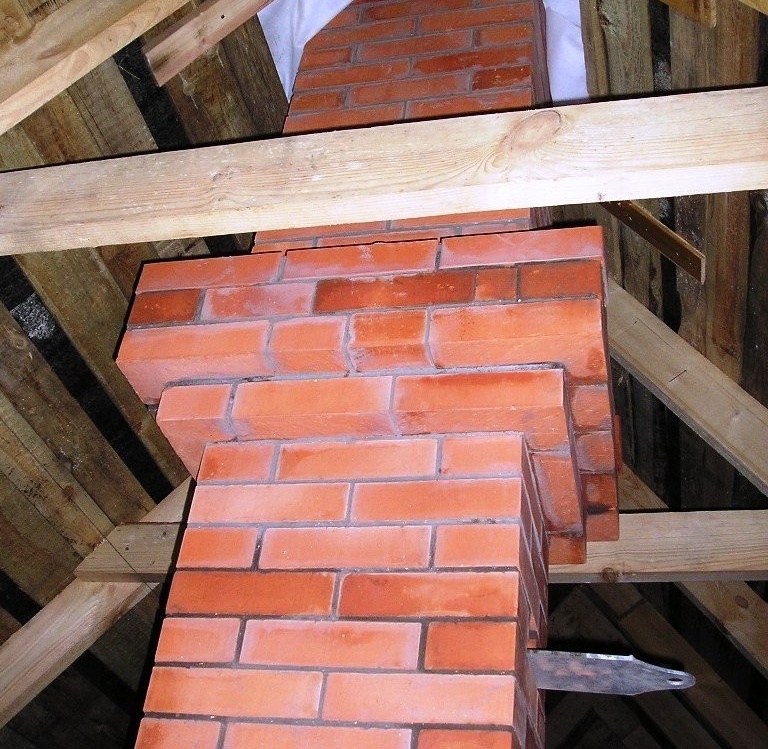
- Fluff (or cutting). Thickening of the outer casing inside the ceiling. The goal is to prevent thermal contact of the floor material and the transverse beams with the pipe. At this point, the temperature of the bricks reaches its maximum value, so it is important to take all measures to ensure safety. The internal dimensions of the chimney remain unchanged.
- Riser. Part of the pipe from the canopy to the roof. The dimensions of the riser usually coincide with the dimensions of the extension pipe. The size of the internal section is maintained. If the attic space is equipped as a living room, the riser acts as a heater.
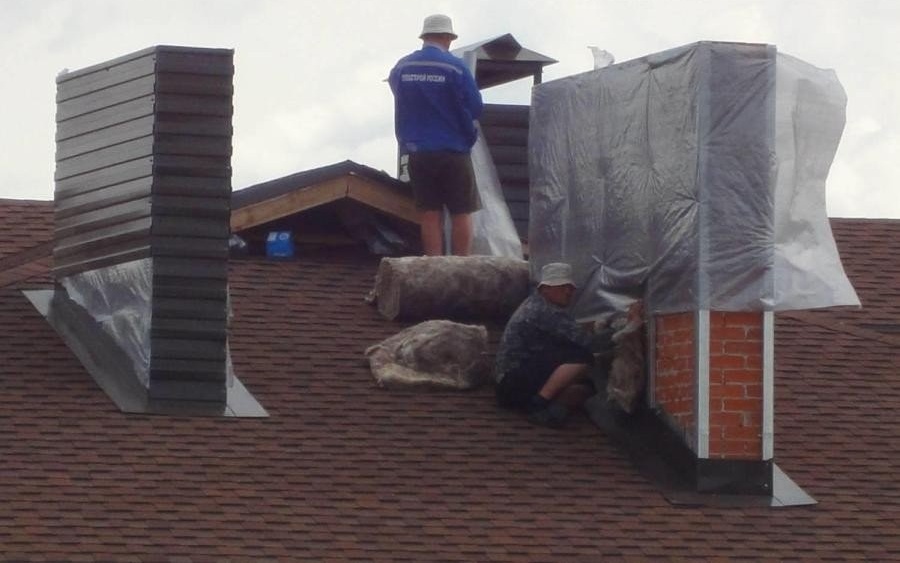
- Otter. Thickening of the outer dimensions of the chimney in order to block the opening in the roof from possible rainfall. A minimum overlap of 10 cm around the entire perimeter of the pipe is considered. The height of the otter depends on the bevel of the roof. Its upper part ends with drainage areas from a cement mortar with increased moisture resistance.
- The neck of the pipe. Part of the chimney made by laying brick on a waterproof solution. Located above the otter, has the same geometric parameters as the riser.
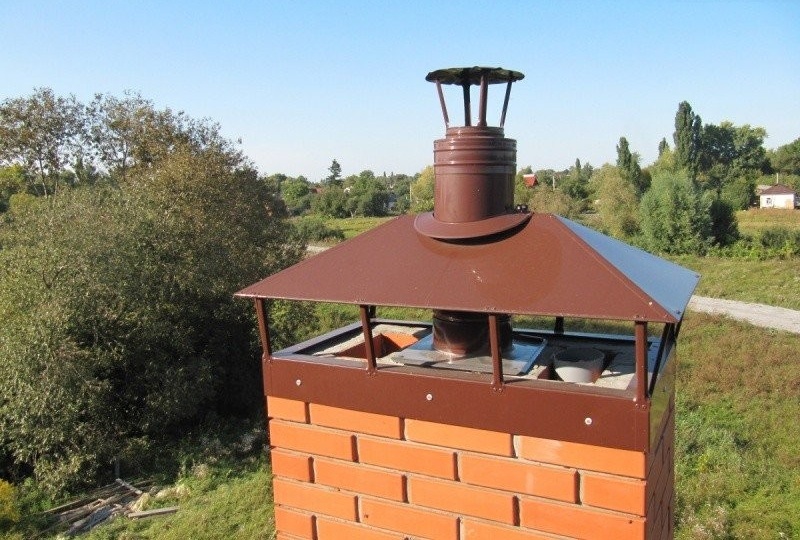
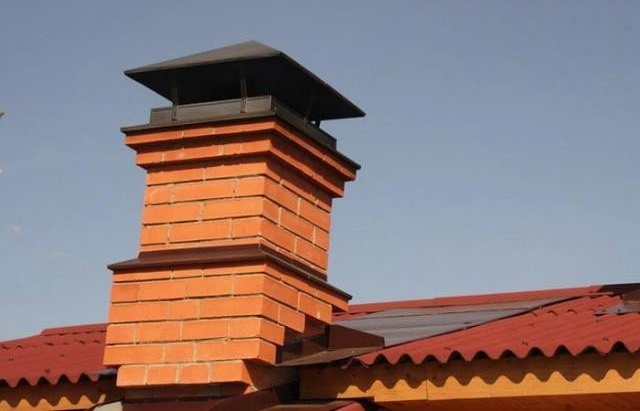
- The head of the pipe. Extension of masonry at the end of the chimney. It has protective functions, prevents foreign objects from getting into the pipe. Often reinforced by a metal frame, deflector or flycar.

All brick chimneys are made according to the same scheme, consisting of several standard elements
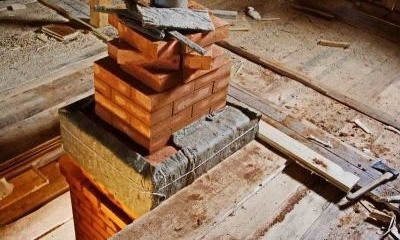
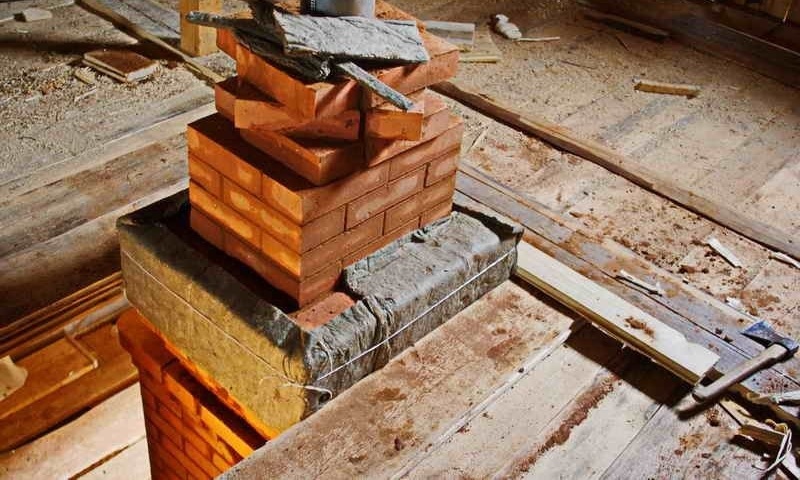
In some cases, a combined pipe design is practiced. The brickwork ends in the attic and then a metal or asbestos pipe is installed on it, which opens onto the roof. In this case, there is no need for an otter, a neck and a head, which significantly saves time and money. It should not be forgotten that the cross-sectional area of the metal pipe should not differ from the cross-section of the brick in a smaller direction. A well-proven combination of stainless steel pipe embedded in an asbestos pipe.

In the upper part of the chimney, where the temperature of the flue gases is not so high, you can make a transition from a brick pipe to a metal one
In both cases, the upper hole must be closed with an umbrella (or deflector), which will prevent direct ingress of rain and snow into the pipe.
You can read more about the principles of choosing a suitable chimney in our article:https://aquatech.tomathouse.com/en/otoplenie/dimohod/dymoxod-svoimi-rukami-v-chastnom-dome.html.
Calculation of the main parameters of the pipe
All calculations for the chimney should be performed at the design stage of the furnace design. The project must be carried out by a qualified engineer or craftsman who is well versed in all the nuances of the furnace business. You cannot plan pipe sizes in isolation from the dimensions of the furnace and heat exchanger. Everything is interconnected and should correspond to one goal - the coordinated operation of the furnace equipment.
If during the construction of the fireplace there is no “body” of the stove, and the firebox is directly connected to the chimney, then in the Russian stove there are additional heating passages in the walls, and it is impossible to correct for this. The presence of strokes changes traction and lengthens the path of flue gases several times. Accordingly, the chimney should create a greater vacuum, so that the movement of gases is accelerated, and soot does not settle inside the course. A separate topic may be the calculation of the parameters of the chimney in a bath stove. It is important here that the draft is not excessive, and the burning fuel has time to transfer heat inside the steam room.
The stove's task is to take into account not only internal, but also external factors - the location of the pipe in relation to the roof, the characteristics of the local climate and even the influence of the landscape.

Chimney draft can be affected by nearby tall buildings and trees, as well as improper chimney heights.
For gas heating systems, due to their increased fire hazard, the calculation of the chimney parameters is carried out by specialists who develop the boiler. Sizes are indicated in the technical passport and are binding.
In private construction, where the furnace is conducted mainly with solid fuel (firewood, coal, peat or fuel briquettes), you can adhere to the following rules that will ensure the proper operation of any furnace:
- the internal cross-sectional area of a rectangular chimney in closed furnaces should not exceed the cross-sectional area of the blower;
- The internal cross-sectional area of the pipe in open-type furnaces and fireplaces is calculated in a ratio of 1:10 with respect to the furnace.
It is believed that if the chimney structure is rectangular, the ratio of the short side to the long should be 1: 2. At the same time, the minimum permissible size of the channel cross section is 14 x 14 cm.
The size of the wall of the channel of the brick chimney should not be less than 14 cm
An important factor is the height of the pipe. The correct calculation allows you to:
- optimize the operation of the chimney and achieve the best efficiency indicators for heat transfer;
- to ensure the safe operation of the heater, to eliminate the leakage of harmful gases due to weak traction;
- ensure fire safety - with excessive traction, sparks and sheaves of flame can escape from the pipe.
In general, the height is determined in accordance with SNiP 2.04.05–91:
- the minimum distance from the grate to the top of the chimney (excluding the protective umbrella) is 5 m;
- the optimum distance is 6 m.
Such parameters provide a stable draft, i.e., the design of the chimney allows you to create a pressure drop sufficient to operate the furnace at any time of the year. But in each particular case it is also necessary to consider:
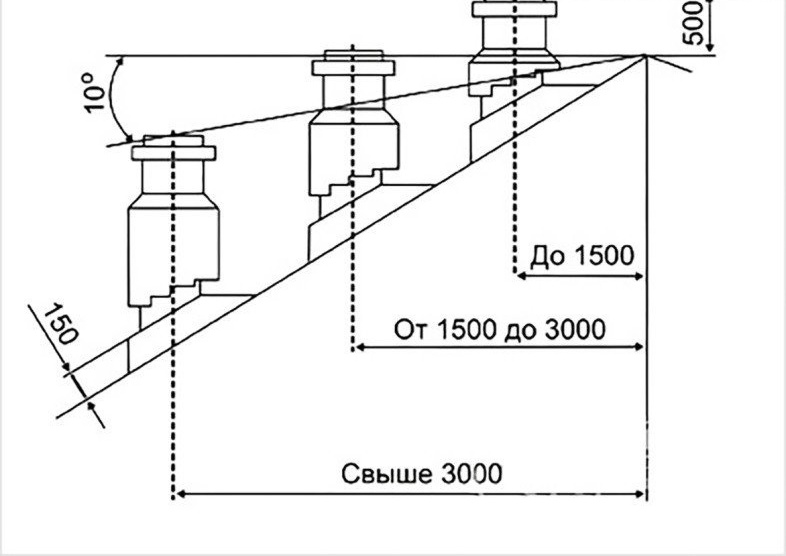
- The height of the chimney head in relation to the ridge of the roof. It should be located:
- 0.5 m above the ridge if the chimney is within 1.5 m;
- at the level of the ridge, if the chimney is removed at a distance of 1.5 to 3 m;
- not lower than the conditional line drawn from the highest point of the roof at an angle of 10about to the horizon, in other cases.

The optimum height of the pipe head depends on its location relative to the roof ridge
- Roof construction, floor thickness, roof slope angle. The length of the riser and the height of the otter depend on this.
- Type of roof - single, double, flat. For flat roofs, there are standards: in the absence of parapets, the length of the chimney above the plane of the roof should be 1.2 m.
- The presence of other devices on the outside of the flat roof, such as air shafts, parapets or protective curbs. With parapets and borders, the required height increases to 2.2 m. The chimney is placed no closer than 5 m from the ventilation hatch.
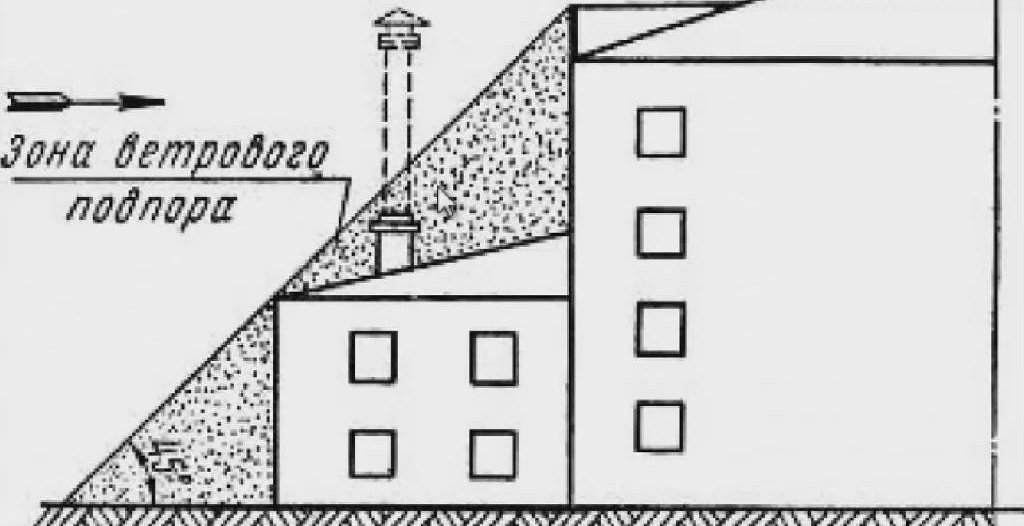
- Third-party factors - trees located near the house, tall buildings, cliffs, steep river banks. The presence of such factors can create the so-called zone of wind backwater, which affects the traction force, interferes with the normal operation of the chimney. The solution to this problem, as a rule, is to increase the height of the pipe.
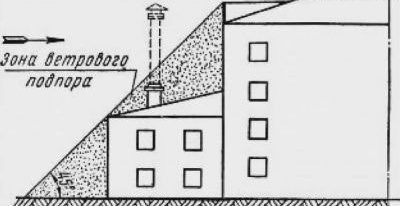
If there are tall buildings or trees near the house, the chimney must be lengthened, taking into account their top instead of the height of the ridge
There is such an unpleasant phenomenon as reverse thrust. This term refers to the movement of smoke in the pipe in the opposite direction - from the chimney channel into the room. There may be several reasons for this, but the main one is the incorrect position of the chimney. As a rule - understated.
An error when choosing the height of the chimney often leads to the appearance of reverse draft
Excess draft can always be eliminated by adjusting the air flow in the ash pan and smoke dampers. Inadequate traction is enhanced in several ways:
- Pipe extension.
- Cleaning the inside of the chimney duct.
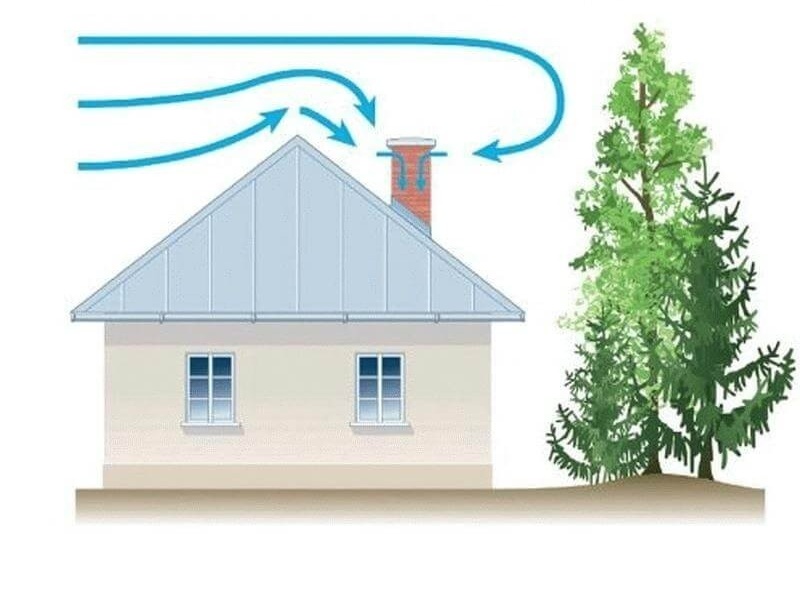
- Installing a deflector.
The deflector not only increases traction, but also protects the chimney channel from moisture, debris and the settlement of birds and bats in it.
According to experts, by installing a deflector on the chimney, you can increase draft by 15–20%
Video: how to calculate the height of the chimney
You will learn about which pipe is better to choose for a chimney, as well as about the advantages and disadvantages of materials in our material:https://aquatech.tomathouse.com/en/otoplenie/dimohod/kakuyu-trubu-vybrat-dlya-dymoxoda.html.
DIY chimney making
Knowing the features of the chimney device and having a ready-made project in hand, you can begin to independently erect a chimney.
Materials and tools necessary for the construction of the chimney
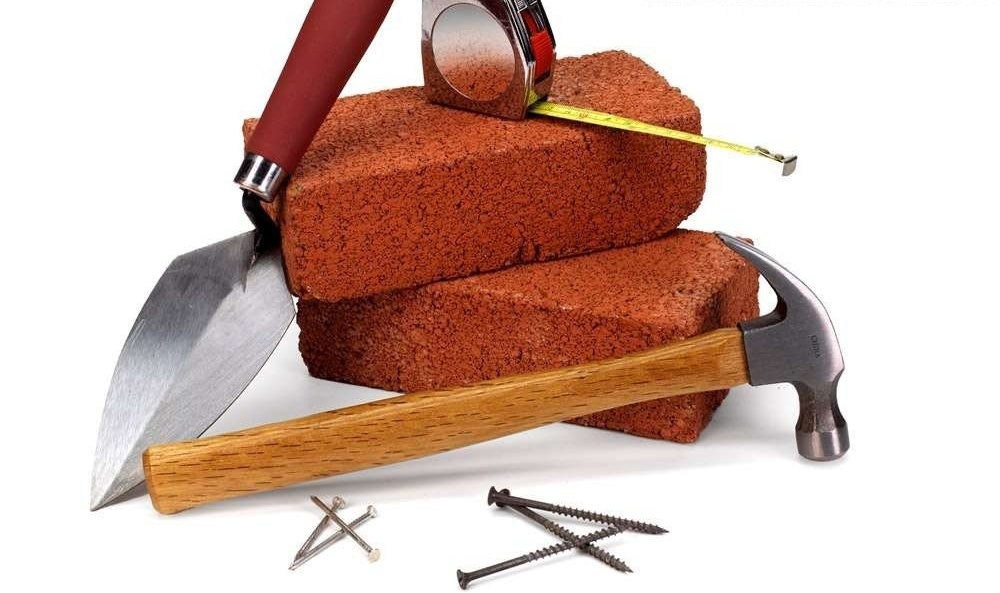
For independent construction of the chimney, the following tools will be needed:
- mason trowel and hammer;
- hydraulic level, plumb (or construction laser level);
- construction bucket for mixing mortar;
- building rule, flashing;
- electric mixer (you can use a conventional drill with a nozzle);
- measuring tools - tape measure, ruler.
Chimney construction requires standard masonry tools
In the process of masonry, smaller building elements must be made of brick - brick plates, a quarter of a brick, half, etc. An experienced bricklayer can cope with the task with one verified blow of a hammer. A beginner stove-maker who does not have such skills can use a grinder with a diamond disk. With its help, cutting any desired shape becomes easily accessible, although accompanied by a large amount of dust.
Some stove stoves successfully use a template made of wood or metal for masonry. The template allows you to strictly adhere to the dimensions, which is especially important for the inner hole of the pipe.
In addition, materials will be needed:
- brick red (in no case white - silicate) solid, hollow, chamotte, clinker;
- cement mixture (may be ready or prepared independently from sand, cement and clay);
- smoke damper or view kit;
- sheet metal or roofing.
Preparatory work before the manufacture of the chimney
Before starting work on laying a brick pipe, it is necessary to carry out certain preparatory work:
- If the pipe is installed on the furnace, you need to prepare the place of its connection with the nozzle chimney.
- If the pipe will be installed on the foundation, it is necessary to perform work on its filling. In the event that the chimney is located indoors, the foundation is laid to a depth of 0.5 m below the level of the building. If the pipe is placed outside the building, the foundation should be quite deep, at the level of soil freezing.
If the foundation is located next to the house, then it must be laid to the depth of freezing of the soil
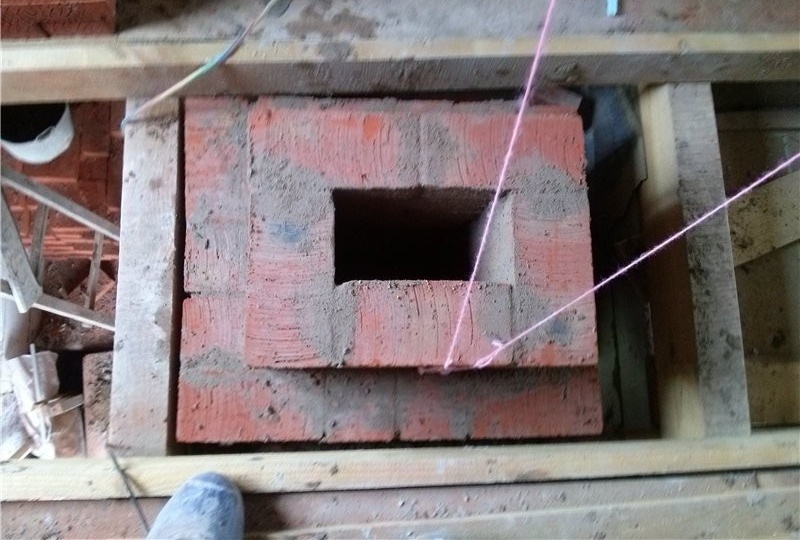
- Prepare holes for the pipe to exit through the floors and roof. The size of the hole must be chosen taking into account the fluff (or otter).
The hole in the ceilings should take into account the size of the fluff and the thickness of the insulation layer
During operation, hands come into contact with chemically aggressive solutions - it is recommended to use protective gloves to protect them.
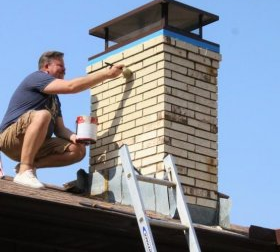
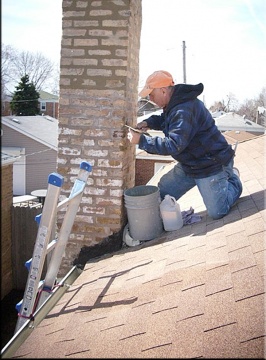
When performing work on the roof, it is necessary to observe personal safety measures, as well as use scaffolding and rope insurance.
At the construction site, there should always be a first aid kit with first aid equipment for injuries and bleeding. Sometimes the chimney is not located in the center of the room, but is in contact with the supporting wall. This situation is often observed during the construction of fireplaces. In this case, you can use the wall structure of the chimney. It is pre-mounted during the construction of the capital wall. It is appropriate to note here that among the stovepipers the classification of chimneys according to design features is accepted:
- Brick overhead. Chimneys installed directly on the masonry.
- Brick indigenous. Pipes located separately from the furnace, standing on a separate foundation. They have the form of a riser.
- National teams. Separate blocks made of refractory concrete, which are stacked at the installation site of the chimney.
- Wall. They are built into the load-bearing wall, significantly saving the area and volume of the premises. However, it should be borne in mind that wall pipes are undesirable to be mounted in external walls. Contact with cold outside air sharply reduces the efficiency of such a chimney in terms of heat transfer.
In wooden houses, the places where the pipe adjoins the combustible elements of the building are accompanied by a thickening of 1–1.5 bricks. In order to avoid ignition, the joints are additionally laid with asbestos or felt sheets. Felt is pre-soaked in a liquid clay solution.
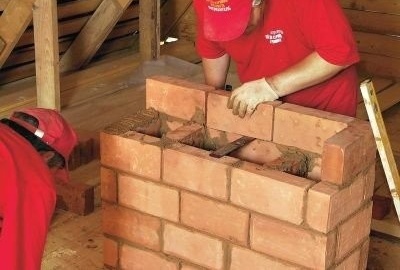
Step-by-step instructions for building a chimney from a brick
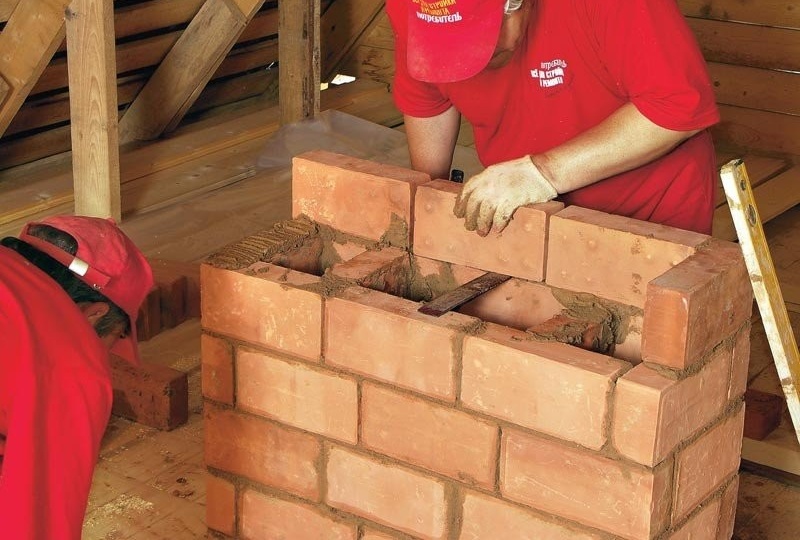
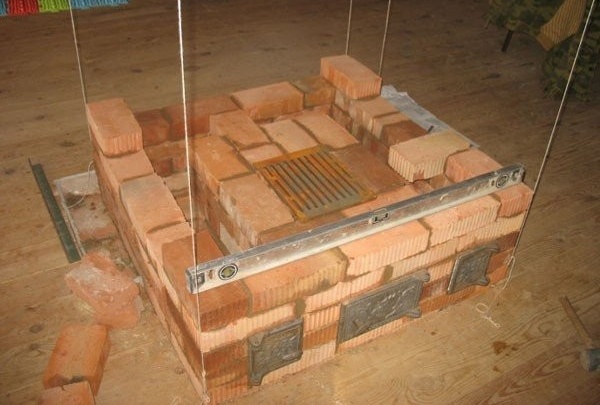
The construction of the chimney consists in carrying out masonry in strict accordance with the layout plan of the material in each row - the order. This plan should be drawn up during the design of the construction of the smoke exhaust channel.
Each row of the masonry chimney has a strictly defined arrangement of bricks
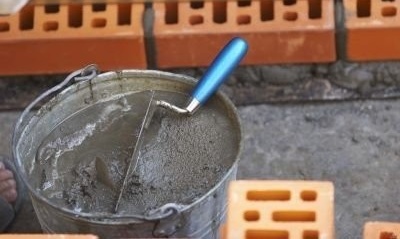
We can only add that for the best bonding of bricks with mortar, it is recommended to adhere to the following installation installations:
- The solution is applied with a layer of 1.5–2 cm, the brick is wetted and coated with the solution. After installation in place of the masonry, the brick is pressed down so that the final joint thickness is 1 cm.
When laying each brick, it is necessary to check its horizontal and vertical position, as well as maintain the joint thickness of 1 cm
- During masonry (after 5-6 rows), it is recommended to do squeezing - grouting of the joints between the bricks inside the chimney channel. A smooth inner surface will ensure good exhaust gas passage, reduce the risk of soot deposits. Grouting can be done with a wet rag.

Internal seams are leveled and wiped with mortar during masonry
- Installation of a smoke damper is usually carried out between the second and third row of bricks.But the rule is not rigid - you can adjust the installation location according to the situation. Immediately after installation, the valve is closed so that the cement slurry does not fall into the furnace.
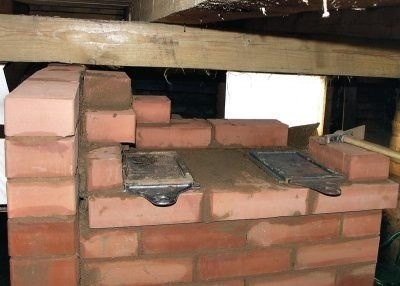
A separate valve is placed on each smoke channel.
- In the outer masonry - on the roof - a solution with increased characteristics of strength and moisture resistance is used. To do this, the proportion of the batch is changed, increasing the cement content (instead of 1/4, 1/3 is made). Moreover, the cement is selected brand M 500 or M 600. For the head often use is not a cement-sand composition, but cement-clay. It is made by adding 1 liter of cement to 10 liters of sand-clay mortar, which is used for laying the furnace.
When using hollow bricks, the internal cavities are filled with cement mortar
- It is important to keep the solution clean. It is unacceptable to get garbage into it, especially of organic origin.
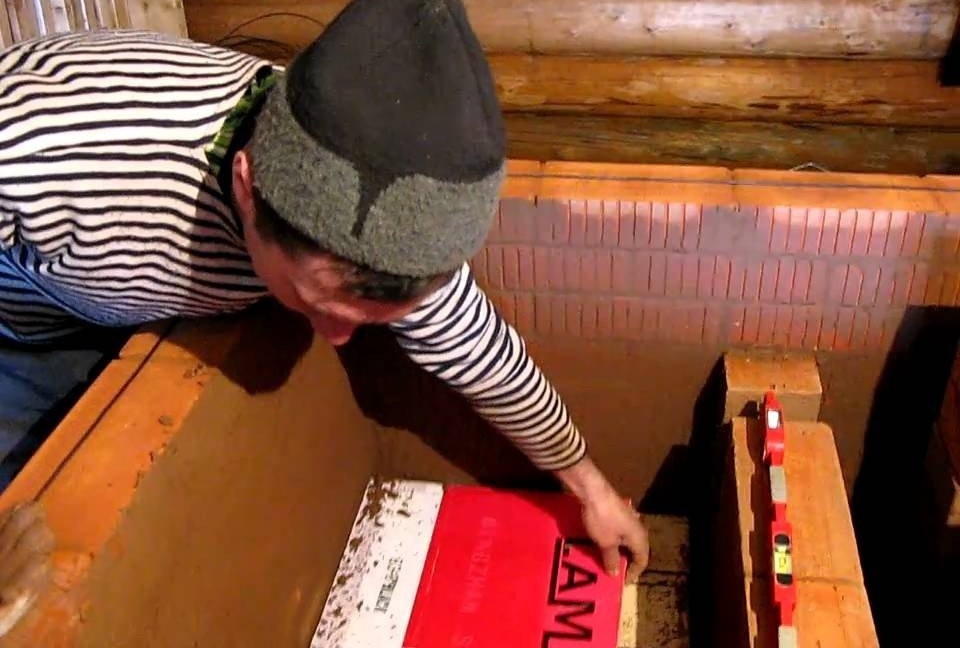
- Direct sections of the chimney are laid out on a plumb line. For this, durable silk threads are pulled in each corner and aligned vertically. The right angle is controlled using a square every 4–5 rows.

It is convenient to control the vertical position of the chimney walls with the help of cords stretched in each of the four corners

Video: do-it-yourself chimney for a fireplace
Chimney insulation
Outdoor chimney insulation designed to eliminate the main enemy of the pipe - condensate, which is formed in the cold season as a result of condensation of water vapor on the inner walls. A particularly large amount of moisture is contained in wood - up to 25% in dry and up to 60 in freshly sawn. Coal does not contain vapors, but since air from the living room is used in the combustion process, its humidity can reach 8–10%. Passing through the cold pipe at a low speed, the vapor precipitates in the form of droplets on the inner walls and, mixed with soot, turns into a reactive acid.
Insulation of the chimney pipe avoids the formation of condensate on its inner walls
Three main methods of insulation are used:
- Plastering. The easiest and most affordable way that does not require special skills. It consists in the fact that several layers of slag-lime mortar are applied to the chimney, which, when solidified, forms a strong protective “coat”. To strengthen the adhesion of the plaster to the masonry, use a metal mesh, fixing it to the pipe with anchor nails. After applying 3-4 layers (with intervals for drying), the insulated surface is covered with white or lime. As practice has shown, such protection can reduce pipe heat transfer by 20–25%. This method is fast and does not require large financial costs.
After covering the chimney with several layers of plaster, its heat loss is reduced by 20–25%
- Warming with wooden boards. Boards 30–40 mm thick will be required. Around the entire chimney (starting from the otter to the tip), a wooden frame is mounted and completely lined with a board. Wood is protected with slate on top. The distance between the brickwork and the boards (5–7 cm) is filled with any non-combustible insulation - earth, sand or mineral wool. In order to avoid spillage of the insulation, the gaps between the boards are closed with a plastic film or puttied with a sealant. This method is effective in the regions of the steppe zone, where dry winds often blow, and prolonged rains are rare.
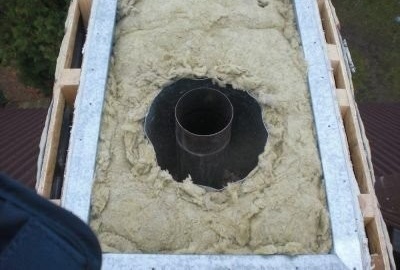
In the spaces between the pipe and the wooden frame, a non-combustible insulation is laid
- The third method requires certain expenses. It consists in the fact that the walls of the pipe are insulated with mineral wool, which is resistant to solar radiation. The best option is basalt wool, which is characterized by very low thermal conductivity. A layer of adhesive is applied to the chimney, to which basalt slabs are attached.For a good grip, the entire array of insulation is fixed with plumbing tape and covered with a reinforced polypropylene film. After the glue has completely dried, the cotton wool is coated with a granular facade paint using a paint net. Another option is siding or cladding with profiled metal sheet. This pipe insulation allows you to save up to 50% of the heat inside the chimney. And, as a result, ensure the absence of condensation on the inner walls.
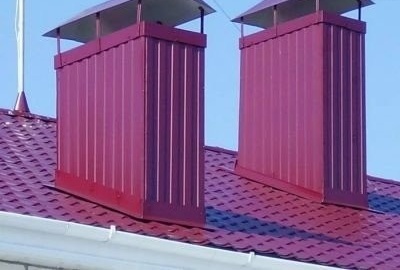
A layer of glued stone wool can be protected with sheets of profiled metal - it will be reliable and beautiful


Video: insulation of the chimney
For more information about heaters for chimneys and what mistakes are often made during installation, read our next article:https://aquatech.tomathouse.com/en/otoplenie/dimohod/kak-uteplit-trubu-dyimohoda-svoimi-rukami.html.
Features of the operation of brick chimneys
After the construction of the chimney is completed and the pipe is successfully put into operation, it is advisable to familiarize yourself with the features of using a brick stove. In order for the heating unit to serve for a long time and without accidents, it is necessary to observe simple but important rules.
- The main enemy of the brick is sudden changes in temperature. It is better to heat more often, but for short periods of time. For one furnace it is not recommended to do more than 2 bookmarks of fuel. This is especially true for coal, the combustion temperature of which exceeds 1000 degrees.
- Timely cleaning of the pipe from soot indefinitely extends the life of the chimney duct.
- If cracks occur on the furnace body and chimney in particular, immediate measures should be taken to eliminate them. Running cracks tend to progress quickly and pose a threat not only to the integrity of the masonry, but also to human health. Through small cracks, carbon monoxide penetrates into the living room, which is colorless and odorless, but poisonous to all living things.
- The slightest malfunction in the door of the furnace or blower (ash chamber) at first significantly reduces the heat transfer of the furnace, and then lead to an avalanche-like accumulation of soot in the chimney channels. If you find a door, view, or valve that does not close properly, you should immediately repair or replace them.
- At least once a year, furnace maintenance is required. This is best done at the end of summer, before the start of the heating season. A daily preventive procedure includes opening the blower door for 15–20 minutes. This simple action will allow for a short time to create maximum traction, which will stretch the soot deposited on the walls into the external environment.
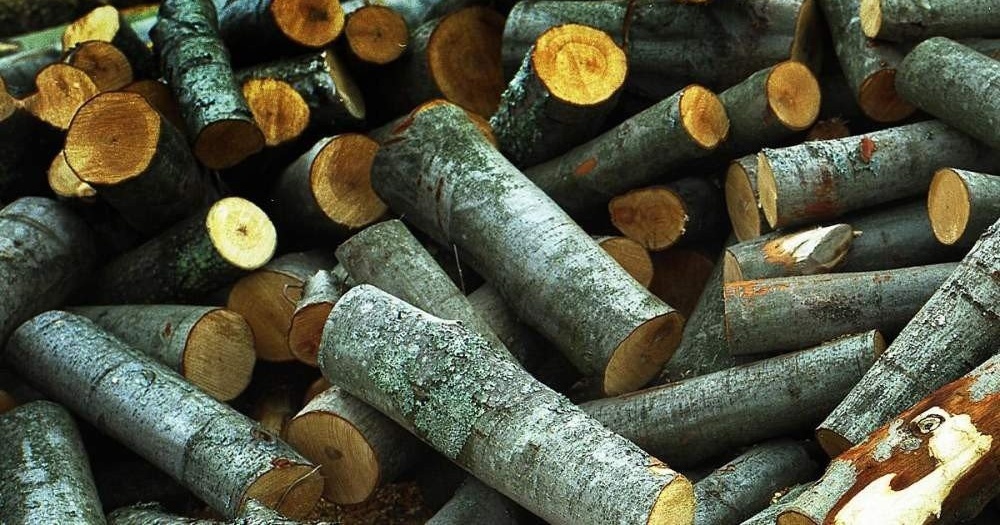
- The use of raw firewood adversely affects the cleanliness of smoky canals, especially in winter. It is more rational to use fuel briquettes, the moisture content of which is much lower. Firewood should be prepared ahead of time - drying wood in a natural way - a long process (from a year to two).
Chimney cleaning and repair
For cleaning the pipe, both traditional and modern methods are used, based on the achievements of technological progress.
From time immemorial, stove maintenance has been done by people whose profession was called a chimney sweep. Today, finding a professional chimney sweep is problematic. They were replaced by chemicals, which, incidentally, are also often called "Chimney Sweep".
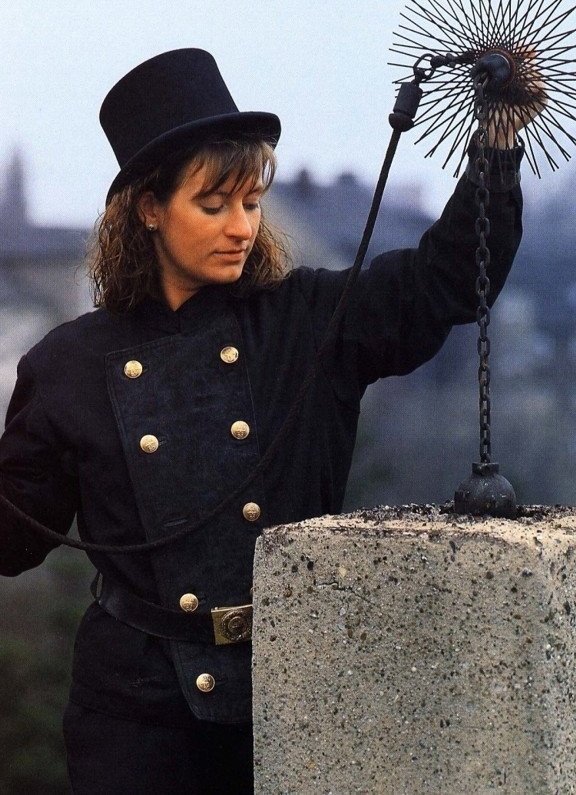
It’s very difficult to find a professional chimney sweep today, this profession is a thing of the past
So, well-proven tool called "Log Chimney Sweep." It contains salts of copper sulfate and other active chemical compounds. Burning in the furnace, the fumes of these substances interact with carbon deposits deposited on the walls of the pipe. Under the action of heat, the reaction lasts several weeks and leads to the fact that the solid structure of soot disintegrates and, once again in the furnace, burns out.According to manufacturers, the use of "miracle log" twice a year allows you to completely remove soot from the pipe. The result is good traction and a high percentage of heat transfer from the furnace.
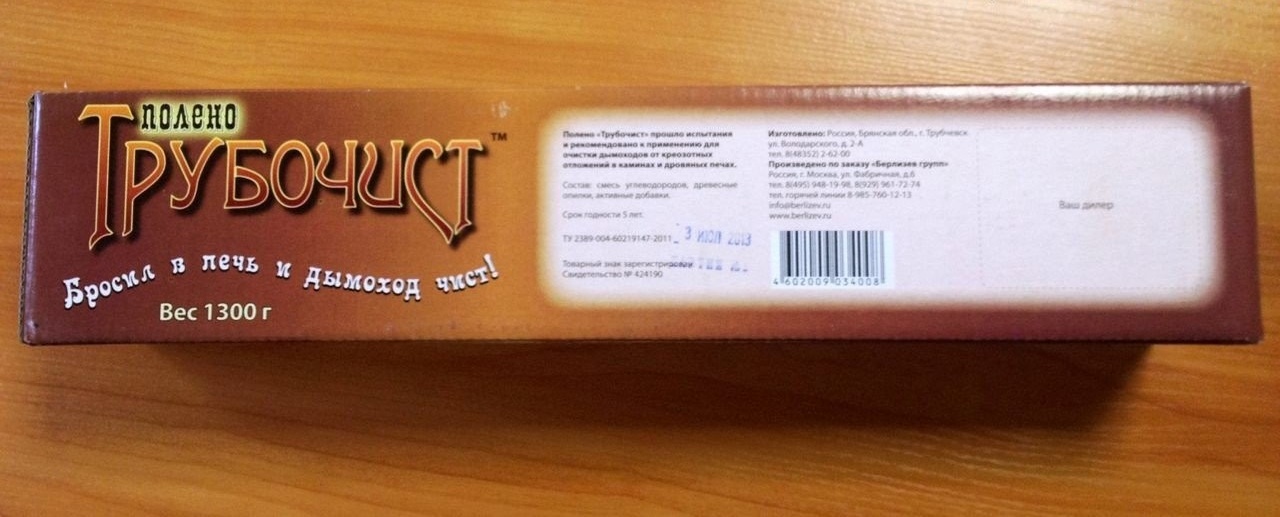
Manufacturers of "Log Chimney Sweep" claim that its use twice a year allows you to completely clean the chimney from soot
From folk remedies, effective prevention methods such as burning salt or soda once every 2 months (about 0.5 kg per furnace) can be noted. The powder is poured into the combustion chamber at a time when the firewood has flared up well and the temperature is maximum. After that, you need to tightly close all the doors, as the reaction can be quite violent.
Dry aspen firewood helps to clean the chimney. The fact is that aspen burns with a large release of heat, the flames are long and penetrate deeply into the passages.
If there is no aspen or soda, you can use potato peelings. To do this, accumulate about half a bucket of potato peel. When burned in the furnace, the released substances bind soot and make it burn to the end.
The burning temperature of aspen firewood reaches 800 degrees, so the soot on the walls of the chimney burns out
Carrying out the installation of chimneys, especially at the site of installation of the neck, otter and head, carefully observe safety standards. If you work carefully and follow the necessary instructions and technologies, a brick chimney can easily be folded with your own hands.