DIY wiring and installation of plumbing: general provisions and useful tips
Repairing a bathroom or toilet is often associated with the replacement of plumbing equipment, as well as pipes. The procedure is very responsible and quite complicated. However, do not rush and call the plumbing: with your own hands it is quite possible to competently perform the wiring and install the selected equipment. At the same time, a certain amount will be saved, which will become completely superfluous for the family budget. However, so that the result of the work only pleases, you should get acquainted with the stages of the plumbing work.
We plan future work
Repair should begin with careful planning of upcoming events. Pipe routing - one of the most important elements that form the sewage system and water supply. The functionality of the structure depends on how well it is planned and implemented. At the planning stage, several important factors must be identified.
We select the method of installation of the pipeline
Pipe laying can be carried out closed or open. Both of these schemes are, in principle, equally reliable. They differ in the features of operation and maintenance. Outdoor installation involves installing pipes over walls or floors. If desired, they can be hidden by various decorative designs. The main advantage is the easy access to communications. If you need to connect new elements, service or repair, you will not need to destroy the decorative coating that conceals the pipes. In addition, the slightest leak or other problem will immediately become apparent and timely eliminated.
With hidden installation, pipes are mounted directly into the wall, which is certainly more aesthetically pleasing. However, maintenance and repair of communications is very difficult. As well as inspecting parts for leaks or other problems. For flush mounting, it is advisable to install sensors that report a water leak. In any case, in order to gain access to the pipeline, you will have to open the wall, which is the biggest disadvantage of this type of installation.

An open pipe routing option is the easiest to execute, maintain and repair. Not aesthetic appearance, if desired, can be covered with decorative accessories
You may be interested in our material, which compares the tee and collector wiring diagrams:https://aquatech.tomathouse.com/en/santehnika/razvodka/sxema-razvodki-vodoprovoda.html
The importance of pipe manufacturing material
As experience shows, do it yourself wiring plumbing The easiest way to do this is with polypropylene or plastic pipes. These are reliable, easy-to-use parts that are easy to process and quite easy to install. To make connections of metal-plastic structures, different types of fittings or crimp couplings are used, which are installed using special pliers.Due to the fact that special equipment for installation is not required, metal-plastic can be mounted even in the most inaccessible places.

Plastic pipes can be connected using fittings or crimp couplings. In the second case, special pliers will be required for installation
The connection of polypropylene pipes is in the form of a weld. For work, you will need a special device, which is best rented or borrowed from friends. This moment must be taken into account when choosing pipes, since in hard-to-reach places it will be almost impossible to connect polypropylene elements. An additional argument for choosing polypropylene will be the ability to easily fix the failed joint, which is very valuable for a novice plumber.
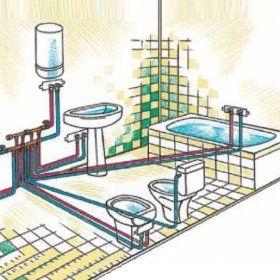
Wiring diagram device
You can choose a breeding scheme for water pipes from two options: tee or collector. The second is considered the most practical and convenient. He assumes that when installing plumbing in the bathroom or toilet room, each device will be connected separately, which significantly reduces the pressure drops in the system and allows for repairs without shutting down the pipeline. The option is characterized by extreme ease of installation and a minimum of connections, but it costs more than a tee scheme. It is somewhat more complicated in execution. Experts recommend installing a shut-off valve on each of the branches from the main system during its assembly so as not to overlap the entire structure in the event of a breakdown.
The result of the planning will be the arrangement of plumbing equipment and pipe wiring. It is carried out after accurate measurements of the room and the devices that will be installed in it. Using such a plan, it will be much easier to determine all the necessary details and their quantity, as well as to prevent possible misunderstandings with the output of the installation angles during the installation of equipment. It is very nice to number each detail of the wiring in the order in which the assembly will be performed. You can also make a list of all elements indicating the type of compounds and the length of the fragments.

An example of a pipe layout. Carrying out a similar drawing on your own for ease of installation, it is best to number all the elements and indicate their sizes
Read also about how to make a water pipe from polypropylene pipes yourself:https://aquatech.tomathouse.com/en/santehnika/razvodka/vodoprovod-polipropilenovymi-trubami.html.
Construction Assembly Rules
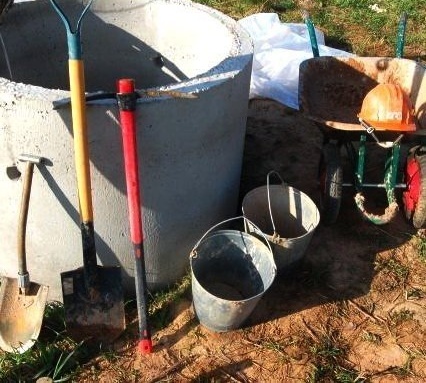
To begin the installation of pipes and plumbing will have to disassemble and removal of old equipment. This should be done carefully enough so that unnecessary damage does not add to your work. After dismantling and cleaning the premises, in accordance with the plan drawn up, a new pipeline is being assembled.
The following rules must be observed:
- A pipe suitable for an apartment should have a larger diameter than the wiring elements in the room.
- Filters will help protect equipment from clogging with rust and debris found in tap water.
- Pipes intended for installation in the wall should not be connected by threaded connections.
- It is necessary to check the water pressure, if necessary, increase the pressure.
Before starting work, pipes cut into fragments of the desired length can be numbered in accordance with the scheme. So it will be easier to carry out installation. After assembling the pipeline, plumbing is carried out: the operation will be easier to perform, referring to the manufacturer's instructions. Exposed instruments are connected with flexible hoses and hoses, after which the build quality should be checked and shut-off valves opened.
You may also find the material with a guide for replacing the riser in the apartment:https://aquatech.tomathouse.com/en/vodosnab/document/zamena-stoyakov-vodosnabzheniya.html
Pipe wiring and installing plumbing equipment is not so difficult, even without the help of a qualified plumber. A little patience, accuracy in the performance of work and careful acquaintance with the instructions will bear fruit: the new equipment in the bathroom will only please with its impeccable work.